Seventh post in the HPE Morpheus Enterprise track. The appliance is built (E1.4) and the data model is designed (E1.5); now we connect something real.
Adding a vCenter cloud to HPE Morpheus Enterprise Software (Morpheus Enterprise) takes about five minutes. Making four decisions correctly while you do it takes longer, and determines whether the integration behaves for the next two years.
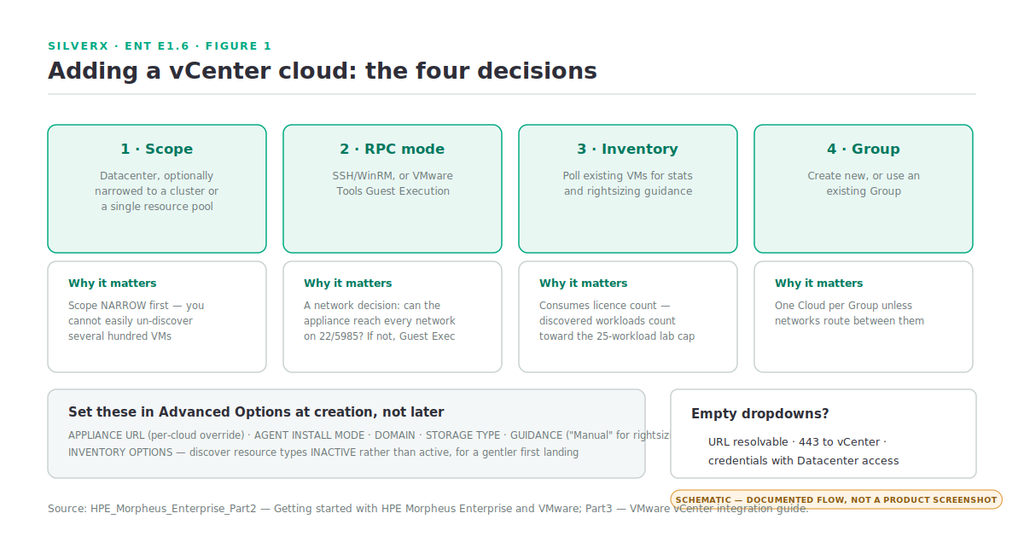
The four: scope, RPC mode, inventory, and Group placement. Everything else in the wizard is either self-evident or safely changed later.
Before you start
Create the Group first. From E1.5: Clouds are added to Groups, and a user can only reach Clouds in Groups their Role grants. The documented getting-started flow creates the Group before the Cloud for exactly this reason.
Infrastructure > Groups > +CREATE, give it a name, and set the CODE field deliberately — it’s what the API and CLI use to refer to the Group later.
You’ll also need two things from the vSphere side:
- vCenter API URL — the vCenter web client URL with
/sdkin the path, i.e.https://vcenter.example.com/sdk - Credentials in
user@domainformat, with Datacenter-level access
On permissions: A1.1 mentioned that VM Essentials can run with either an administrator account or a minimum-privilege account, and the same applies here. The docs give a full privilege list — Content Library, Datastore, Distributed Switch, Global, Network, Resource, Scheduled Task, Tasks, Virtual Machine (all), vApp, and vSphere Tagging — with specific propagation rules per usage construct. If your security posture requires least privilege, budget an hour to build the role properly; if not, a vCenter admin account works and skips the whole conversation.
Decision 1: scope
Once URL and credentials are entered, the dropdowns populate. A cloud integration is scoped to a specific datacenter, and can optionally be narrowed further to a single cluster or even a single resource pool.
If those dropdowns stay empty, the documented checklist is: verify the API URL is resolvable, that Morpheus has access to vCenter on 443, and that the credentials are correct with sufficient permissions. That covers essentially every failure at this step.
How to choose. Scope narrow for a first integration — one cluster, or one resource pool — so that brownfield discovery brings in a manageable set of VMs. You can add a second, wider cloud later; you cannot easily un-discover several hundred VMs.
There’s also Resource Pool scoping: allow the cloud to provision into All Resource Pools or a single one. Choosing All keeps the pools individually manageable from the Cloud detail page for sub-account visibility, which is how you carve one vCenter across tenants.
Decision 2: RPC mode
RPC Mode determines how Morpheus connects to VMs to make configuration and scripting calls when the agent isn’t installed. Two options, and the documentation gives conflicting-sounding advice that’s actually consistent once you read the constraint.
The VMware getting-started guide recommends VMware Tools in a VMware environment. The vCenter integration guide says the VMware Tools Guest Execution API “can be tricky so it is recommended to use SSH/WinRM if possible” — however, if the appliance cannot have outbound access to all networks where VMs are provisioned on ports 22 and 5985, Guest Execution is the only option.
So the actual rule:
- Can the appliance reach every provisioning network on 22/5985? Use SSH/WinRM. More predictable.
- Can’t it? Use VMware Tools Guest Execution, which rides the vCenter connection instead of needing direct network reachability.
That’s a network-topology decision, not a preference. Answer it before you pick.
Decision 3: inventory existing instances
INVENTORY EXISTING INSTANCES starts polling existing VMs for statistics and rightsizing recommendations. It’s how you get value from brownfield discovery, and it’s genuinely useful — the Guidance feature (set to “Manual” under Advanced Options) builds rightsizing recommendations from that data.
Two consequences to weigh before you tick it.
Licence consumption. As covered in A1.5, the lab licence counts **managed and discovered** workloads toward its 25. Enabling inventory against a populated vCenter on a lab-licensed appliance will exhaust the allowance immediately. On a properly licensed appliance this is a non-issue; on a PoC it’s the single most common cause of “Morpheus stopped letting me provision.”
Load. Polling every VM in a large datacenter for statistics is real work for the appliance. Scope the cloud narrowly for a first integration and this stays comfortable.
Alongside it, ENABLE HYPERVISOR CONSOLE gives the native vSphere console, requiring port 443 connectivity between Morpheus and the ESXi hosts — not just vCenter. That’s an extra firewall line people miss.
Decision 4: Group placement
The wizard offers to create a Group or use an existing one. Use the one you created earlier.
The documented guidance, worth repeating from E1.5: organise so that one Cloud exists in one Group, unless networks permit internal routing between Clouds — in which case combining supports bursting and hybrid patterns.
Advanced options worth setting now
The Advanced Options drawer contains several things that are easier to set at creation than to fix later:
| Setting | Why now |
|---|---|
| APPLIANCE URL | Overrides the global Appliance URL for everything provisioned into this cloud — the split-DNS fix from E1.2 |
| AGENT INSTALL MODE | Cloud-Init/Unattend (default, with SSH/WinRM fallback) or SSH/WinRM/Guest Execution |
| DOMAIN | Guest domain for provisioned workloads |
| STORAGE TYPE | Default provisioning behaviour |
| GUIDANCE | Set “Manual” to get rightsizing recommendations |
| INVENTORY OPTIONS | Discover Service Plans, Resource Pools, Networks, Security Groups, Datastores and Folders in an inactive state rather than active |
That last one is underrated. By default every discoverable resource type arrives active. Unchecking selected types means they’re discovered but inactive — visible, but not immediately usable for provisioning. For a first integration into a busy vCenter, that’s a gentler landing than everything switching on at once.
For proxied environments, the same drawer carries PROXY, Bypass Proxy for Appliance URL, and NO PROXY — covered in E1.2.
After it syncs
Complete the wizard and Morpheus starts inventorying. Give it a few minutes, then the Cloud detail page gives you estimated costs and cost history, resource utilisation metrics, and counts for container hosts, hypervisors, bare metal, virtual machines and unmanaged resources — each drillable.
Two follow-up tasks:
Resource pools. Infrastructure > Clouds > (your cloud) > RESOURCES shows synced resource pools. Each can be edited — unmark ACTIVE and save, and the pool greys out and stops being provisionable. This is how you stop Morpheus from offering a pool that belongs to another team.
Folders. Once the integration exists, folders appear on the Cloud detail page’s Resources tab. A folder can be set as Default (pre-selected when provisioning into the Cloud) and/or as Image Target (where Morpheus looks to onboard VMware images). Setting Image Target deliberately saves confusion when your templates live somewhere specific.
Gotchas and caveats
Empty dropdowns = URL, 443, or permissions. In that order.
Hypervisor console needs 443 to the ESXi hosts, not just to vCenter.
Windows provisioning triggers sysprep by default. Guest customisations reset the Administrator user and password, with Morpheus setting it from Administration > Settings > Provisioning > Windows Settings > Password. And guest customisations are required when assigning static IPs manually or using IP pools.
Images don’t span vCenters. A Morpheus appliance may have many vCenter Clouds across many vCenter appliances, but if the same image is needed in multiple vCenter Clouds you must download the OVF from one and upload it to the others. That’s a vCenter limitation, not a Morpheus one — but it’s invisible until it bites.
Deleting the cloud means emptying it first. Every Instance, managed host and VM goes before the Cloud can.
Key takeaways
- Create the Group first — Clouds live in Groups, and Roles grant access to Groups.
- Scope narrow for a first integration: one datacenter, ideally one cluster.
- RPC mode is a network decision: SSH/WinRM when the appliance can reach every provisioning network on 22/5985, VMware Tools Guest Execution when it can’t.
- Inventory Existing Instances delivers rightsizing data and consumes licence count — fine on a licensed appliance, fatal to a 25-workload lab licence.
- Set the per-cloud Appliance URL, agent install mode, and inventory options at creation.
- Hypervisor console needs 443 to ESXi hosts.
What’s next
Next in this track: E1.7 — Users and Roles in Practice. Building the two-axis Role model from E1.5 for real: Group-access Roles, feature-access Roles, Tenant Roles as ceilings, identity-source mapping, and the permissions worth restricting on day one.