Third post in the HPE OpsRamp track. O-2 covered the collection layer; this is what it collects, and what happens to it.
You deploy a gateway, run discovery, and several hundred resources appear in the inventory. None of them are being monitored. Nothing alerts. The platform looks broken.
It isn’t. Discovery and monitoring are two separate things in HPE OpsRamp Software (OpsRamp), and the join between them is a mechanism most people don’t find until they go looking. This post covers the pipeline end to end — how discovery works, what lands in inventory, and the piece that closes the gap automatically instead of by hand.
What discovery actually is
The documentation defines it plainly: discovery is “the process of automatically identifying and mapping IT assets and resources across the on-premise and private cloud environments,” and it works by deploying collectors into your environment to gather resource information.
Three methods, matching the collection layer from O-2:
| Method | What it gives you |
|---|---|
| Agent-based | The most comprehensive OS and hardware detail |
| Gateway-based | SNMP, WMI, and Linux agentless (SSH) |
| Specialised | Cloud, VMware and Kubernetes environments |
What the collectors bring back falls into three buckets: basic identification (hostnames, IP addresses, MAC addresses, OS information), hardware detail (CPU, disk drives, memory, network interfaces, BIOS), and metadata (firmware versions, device types, manufacturers, locations).
One documented limitation worth knowing up front: topology support is available only for SNMP. If network relationship mapping matters to you — and for a network estate it usually does — SNMP discovery isn’t optional, whatever else you deploy.
Why resources arrive “Undefined”
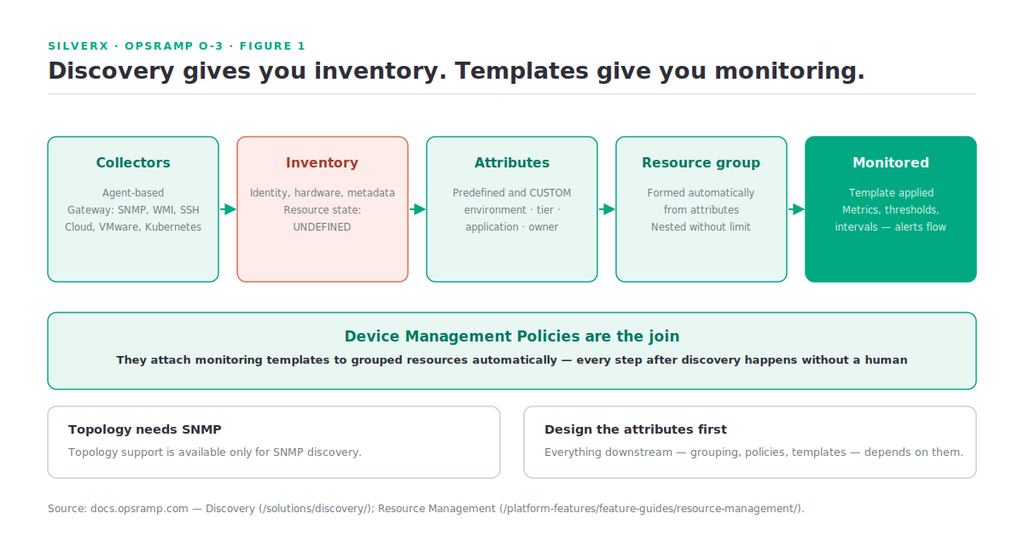
Discovery populates the resource inventory. That inventory is a record of what exists — identity, hardware, metadata — and nothing more. Monitoring is defined separately, by monitoring templates, which carry the metrics, thresholds and collection intervals for each type of infrastructure.
Until a template is applied, a discovered resource sits in an Undefined state: present, catalogued, unmonitored.
This is a reasonable design. Applying every possible metric to every discovered device would be expensive and noisy, and the platform genuinely can’t know whether that Linux box is a production database or someone’s forgotten test VM. But it does mean the naive workflow — discover, then hand-apply templates to hundreds of resources — is unworkable at any real scale.
The mechanism that closes the gap
Device Management Policies are the answer, and they’re the most important feature in this post.
A device management policy automatically attaches monitoring templates to resources, applying consistent configuration across similar infrastructure. Combined with automated grouping, the flow becomes:
- Discovery finds a resource and records its attributes.
- The resource is categorised using predefined attributes or custom, user-defined attributes.
- Those attributes place it automatically into the right resource group.
- A device management policy attached to that group applies the appropriate monitoring template.
- The resource leaves Undefined and starts producing metrics and alerts.
Every step after the first happens without a human. That’s the difference between an observability platform you operate and one that operates itself — and it’s why the attribute and grouping design deserves real thought before you scale discovery up.
Design the attributes first. The custom attribute capability is what lets you encode your operating model — environment, tier, application, owner, support group — onto resources at discovery time. Get those right and the policies write themselves. Skip them and you’ll be hand-assigning templates for the life of the deployment.
Resource groups
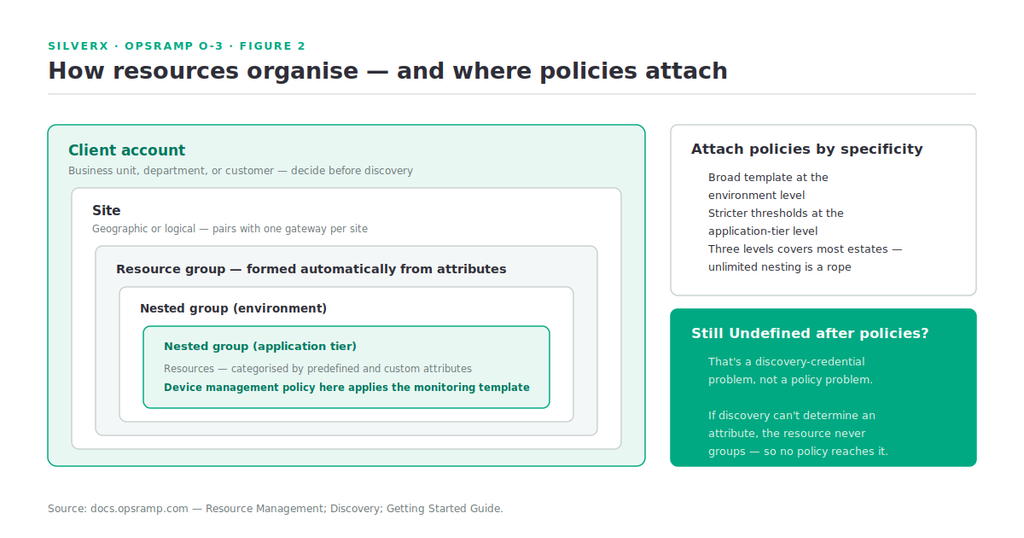
Resources can be grouped for collective management, with unlimited nesting levels. Groups form automatically based on resource attributes, or manually where you need them to. Grouping drives bulk operations — assigning permissions, applying policies, managing similar resources together.
The nesting is worth using deliberately. A structure like Site → Environment → Application tier gives you natural places to attach policies at different specificities: a broad monitoring template at the environment level, a stricter threshold set at the tier level.
Sites provide organisational capability for geographically distributed or logically separated resource collections — which pairs naturally with the one-gateway-per-site placement pattern from O-2.
And the layer above all of it: client accounts, from O-1. Each logical business unit, department or customer maps to a client account, and that structure shapes RBAC, dashboards and reporting. Decide it before discovery, not after.
A working sequence
Putting O-2 and this post together, the order I’d run:
- Client account structure decided and created.
- Sites defined, gateways deployed to match.
- Custom attributes designed — environment, tier, application, owner. This is the step everyone skips.
- Discovery scoped narrowly first — one subnet, one vCenter, one cloud account. Confirm what comes back and how it’s categorised before widening.
- Resource groups built, automatic where attributes allow.
- Device management policies attached to groups, mapping group to monitoring template.
- Widen discovery. New resources now land, categorise, group and get monitored without intervention.
- Tune thresholds on real data — before any ITSM integration, per O-2.
Steps 3 and 4 are where the time goes, and where the payoff is. A deployment that discovers ten thousand resources into a well-designed attribute model is less work than one that discovers five hundred into a flat one.
Gotchas and caveats
Discovery is inventory, not monitoring. The single most common “it isn’t working” ticket.
Topology needs SNMP. No SNMP discovery, no network relationship mapping.
Scope your first discovery narrowly. Discovering a full estate before you’ve seen how resources categorise means correcting at scale rather than at sample size.
Attributes are the leverage point. Predefined attributes get you started; custom attributes encode your operating model. Design them before the estate is large.
Automatic grouping is only as good as its inputs. If discovery can’t determine an attribute — no SNMP community, no credentials, a device that answers nothing useful — the resource won’t group correctly and won’t get a policy. Watch for resources that stay Undefined after policies are in place; that’s usually a discovery-credential problem, not a policy problem.
Unlimited nesting is a rope. Deep hierarchies are powerful and hard to reason about. Three levels covers most estates.
Agents give the most detail — and cost the most to run. Per O-2: deploy agents where you intend to remediate. Gateway-based discovery is sufficient for inventory and monitoring on everything else.
Key takeaways
- Discovery produces an inventory; monitoring templates produce monitoring. They are separate, and resources sit Undefined in between.
- Device management policies close that gap automatically by attaching templates to grouped resources.
- The chain is attribute → group → policy → template. Design the attributes first; everything downstream depends on them.
- Topology mapping requires SNMP discovery.
- Resource groups nest without limit and form automatically from attributes — use three levels, not ten.
- Scope the first discovery narrowly, confirm categorisation, then widen.
What’s next
Next in this track: O-4 — Monitoring Templates and Alert Design. What a template actually contains, how to build one for a resource type you care about, and how to set thresholds that produce actionable alerts rather than a wall of noise you’ll learn to ignore.
Sources: OpsRamp Documentation · Discovery · Resource Management · Getting Started Guide · OpsRamp Core Components.