Eighth and last post in the VM Essentials Foundations module. A1.6 gave the production build sheet and A1.7 covered validated designs. This one is about the lab — where the rules are different, and where they aren’t.
Labs teach you things. Some of them are wrong.
The point of a lab is to learn the operating model before it costs money. The risk is learning something the production system won’t do. A single-host HPE Morpheus VM Essentials Software (VM Essentials, VME) lab teaches you the UI, the provisioning wizard and the image library perfectly well — and teaches you nothing at all about failover, because a single-host cluster cannot fail over.
So the useful question isn’t “what’s the smallest lab that works”. It’s “what does each shortcut cost me in learning?”
What the documentation actually permits
VM Essentials is explicit that physical hosts are recommended for full performance, and equally explicit about what’s allowed below that:
- Three nested virtual machines — a full cluster, HCI or not
- A single physical host — non-HCI only
- A single nested virtual machine — non-HCI only
With one host, you cannot migrate workloads between hosts and cannot use automatic failover. Performance may be reduced in any nested configuration.
The HCI/non-HCI split is the constraint doing the work. Ceph needs three hosts, so any single-host lab is external-storage-only — an NFS share or iSCSI target you provide.
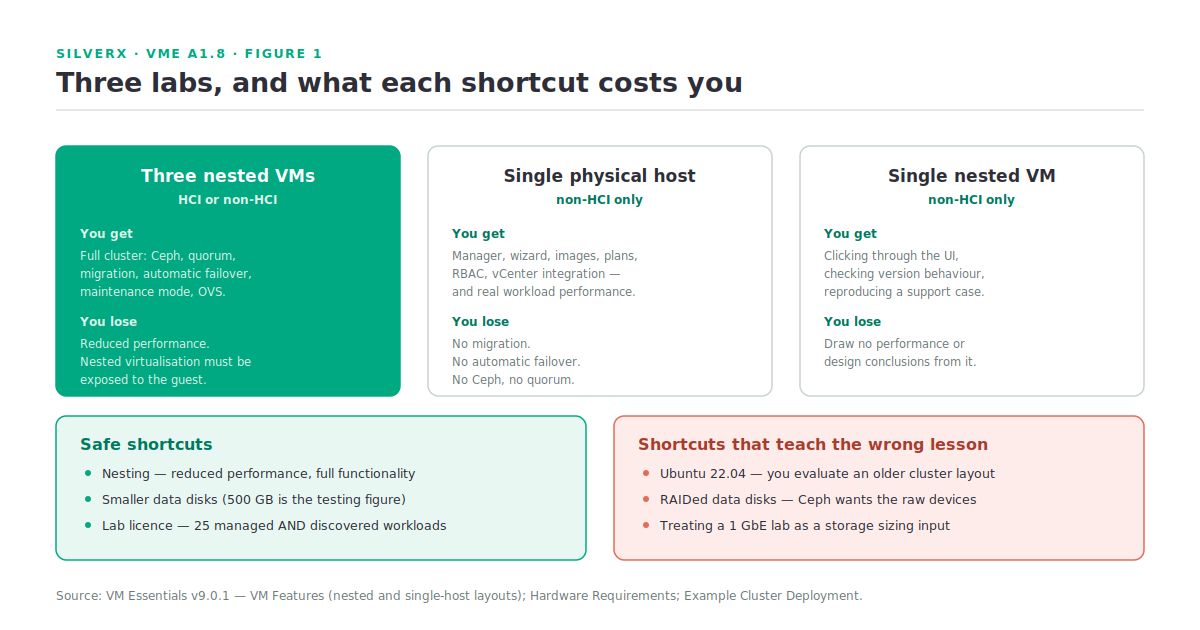
The three labs, and what each teaches
Three nested VMs — the one I’d build
This is the lab that teaches the most per unit of hardware. Three nested guests on whatever hypervisor you already run gives you a genuine cluster: Ceph, quorum, migration, automatic failover, maintenance mode, the OVS data path.
Per-node, following the documented example and A1.6‘s sizing:
| Lab node | |
|---|---|
| OS | Ubuntu 24.04 LTS |
| vCPU | 4, with nested virtualisation exposed to the guest |
| Memory | 16 GB — remember 4 GB per Ceph disk on top of workload |
| Boot disk | 20 GB (15 GB is the documented minimum) |
| Data disk | 500 GB is the documented testing figure; the docs’ 250 GB example is explicitly demonstration-only |
| NICs | 3 — management, storage, compute |
The one thing that will stop you before anything else: nested virtualisation must be exposed to the guest. On the host running your nested VMs, that’s Intel VT-x or AMD-V passed through. Check it inside each guest before you go further:
# Inside each prospective HVM host
grep -Eoc '(vmx|svm)' /proc/cpuinfo    # must be > 0
lsb_release -d                          # Ubuntu 24.04 for current cluster layouts
lsblk -o NAME,SIZE,TYPE,MOUNTPOINT      # data disk present, raw, unmounted
ip -br a                                # static addressing on all three NICs
getent hosts vme-manager.lab.local      # DNS resolution of the manager
sudo apt-get update -qq && echo "repos reachable"
That last one matters more in a lab than in production, because lab networks are where outbound access quietly isn’t configured. Cluster creation downloads and installs KVM, Open vSwitch and dependencies on each host. No internet, no cluster.
Single physical host — non-HCI
Reasonable if you have one decent server and an NFS share. You get the manager, the provisioning wizard, images, plans, RBAC, the vCenter integration, and real workload performance.
You lose migration, automatic failover, Ceph, and every conversation about quorum. If your goal is to demonstrate the management experience — and for a lot of pre-sales work it is — that’s an acceptable trade.
Single nested VM — non-HCI
The smallest thing that runs. Fine for clicking through the UI, checking a version’s behaviour, or reproducing a support case. Don’t draw performance or design conclusions from it.
The shortcuts that are safe, and the ones that aren’t
Safe:
- Nested hosts. Reduced performance, complete functionality.
- Smaller data disks than production. 500 GB is the documented testing figure.
- Collapsing networks onto fewer NICs — accepting that you’re then testing the 10 GbE-plus-jumbo-frames rule the hard way (see below).
- A lab licence. Time-unlimited, 25 managed and discovered workloads. Plenty for a lab, and per A1.5 it will evaporate the moment you point it at a real vCenter.
Not safe:
- Ubuntu 22.04. You’ll be evaluating an older cluster layout than you’d deploy, and stretched clusters need HVM 1.3. Build on 24.04.
- RAIDed data disks. Documented as wrong on physical servers; Ceph wants the raw devices.
- Concluding anything about storage performance from a 1 GbE lab. The documentation says 10 Gbps with jumbo frames is required for clustered storage and that lower configurations are highly likely to be unacceptable. A slow lab is fine; a slow lab that becomes a sizing input is not.
- Skipping the qualification matrix because “it’s only a lab”. True right up until the lab becomes the PoC and the PoC becomes the design.
What to actually do with it
A lab that just exists teaches nothing. The sequence I’d run, in order, each one proving something:
- Build the cluster. Watch the History tab on the Cluster detail page — you’ll see the KVM and OVS installs run per host. That’s the sequence from A1.2 happening in front of you.
- Onboard an image and provision an HVM Instance. Confirm the agent installs; if it doesn’t, you’ve just learned the three-step diagnostic from E1.2 on a system where breaking things is free.
- Create the five network types from A1.2 — Standard, Overlay, Data, Private, SR-IOV if your hardware allows. Watch the plugin propagate config to every host.
- Put a host in maintenance mode. Watch workloads move.
- Kill a host. Not gracefully — power it off. Watch automatic failover, then watch the cluster recover when it returns. This is the single most valuable thing a three-node lab does for you.
- Add a vCenter cloud (E1.6) if you have one, and run a small migration wave. Twenty VMs is the documented batch ceiling; try five.
- Break RBAC on purpose. Build the two-axis Role model from E1.7, then log in as a restricted user and find out what you actually granted.
Step 5 is the one people skip because it feels destructive. It’s the one that tells you whether your understanding of the cluster is correct.
Gotchas and caveats
Nested virtualisation has to be enabled on the outer hypervisor too. Checking /proc/cpuinfo inside the guest tells you whether it was exposed; if it wasn’t, fix it on the host, not in the guest.
Static IPs, always. Documented as a requirement, and a DHCP lease change mid-lab produces failures that look like product faults.
A lab cluster still needs the quorum ports. Corosync 5404–5406/UDP, pcsd 2224, dlmd 21064, plus 9929 and 3121 — see A1.6. Lab firewalls are where these get missed.
The manager is a separate appliance. 16 GB recommended, 200 GB storage as a starting figure. Don’t nest the manager inside the cluster it manages.
Back up the lab manager anyway. The documentation is blunt about recovery: after a total system failure you must provision a new, freshly installed VME Manager — you cannot recover onto a partially configured or corrupted appliance. Learning that in a lab is much cheaper than learning it in production.
Key takeaways
- Three nested VMs is the lab that teaches the most: Ceph, quorum, migration, failover.
- Single host means non-HCI only, and no migration or automatic failover.
- Expose nested virtualisation to the guest and confirm it before anything else.
- Hosts need outbound internet — cluster creation installs KVM and OVS.
- Safe shortcuts: nesting, smaller disks, lab licence. Unsafe: 22.04, RAIDed data disks, and treating a 1 GbE lab as a sizing input.
- Power off a host on purpose. It’s the most valuable thing your lab will do.
What’s next
That closes the Foundations module. Next in this track: A2.1 — Installing the VME Manager, opening the Install & Cluster module — the appliance install end to end, first-boot configuration, the settings to get right before anyone else logs in, and the backup regime to put in place on day one.
Sources: HPE Morpheus VM Essentials Software Documentation v9.0.1
Pingback: Installing the VME Manager – silverX.org
Pingback: Building the First Cluster – silverX.org