Second post in the VM Essentials Install & Cluster module. A2.1 got the manager up, licensed and backed up. Nothing has touched a hypervisor host yet — that’s this post.
The manager doesn’t build your cluster. Your hosts do.
Cluster creation in HPE Morpheus VM Essentials Software (VM Essentials, VME) looks deceptively small in the UI: a handful of SSH credentials, a data device path, three interface names. What that wizard actually does is run scripts across every host you hand it, installing KVM, Open vSwitch and their dependencies, and wiring the result into a Ceph or external-storage cluster. The wizard doesn’t fix a host that isn’t ready — it just fails partway through, on whichever host was wrong, and the failure it reports is rarely the failure you have.
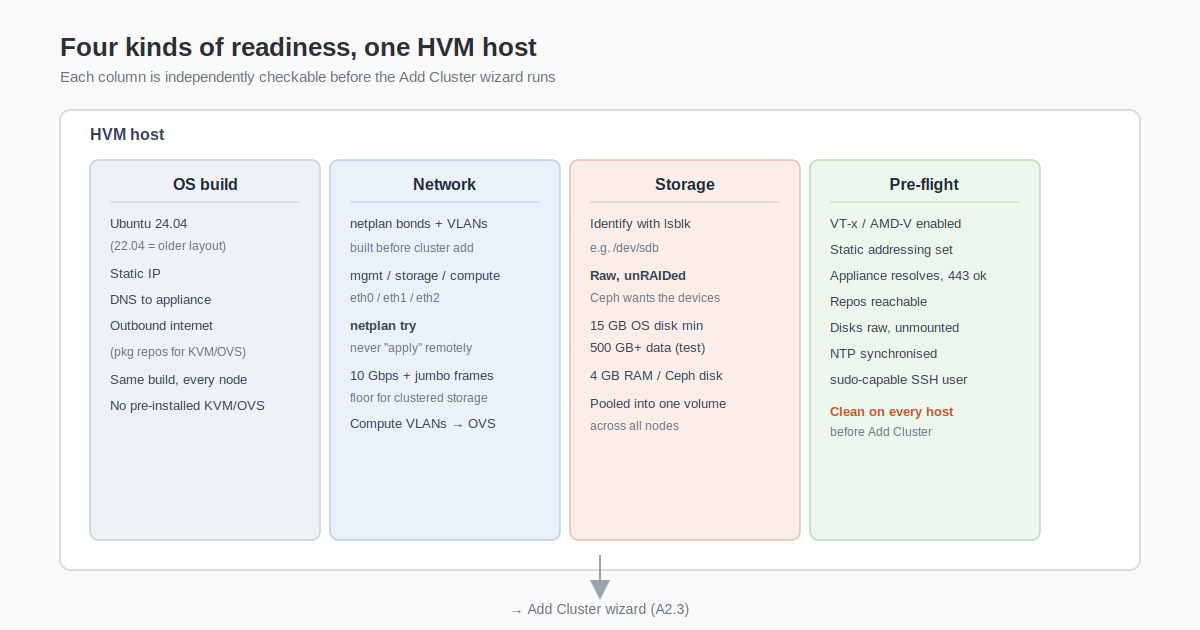
So the work in this post happens before you open the Add Cluster modal: OS build, network configuration, storage presentation, and a pre-flight pass. Get these four right on every node and cluster creation is, per the documentation’s own framing, largely uneventful.
OS build: identical, 24.04, and nothing you don’t need
The default cluster layout expects a pre-existing Ubuntu 24.04 box on every node; an earlier layout (1.1) supports Ubuntu 22.04 for hosts already built that way. There’s no reason to start a new build on 22.04 — it costs you the current cluster layout for no benefit.
Two things worth being deliberate about:
Every node in the cluster should be the same build. The documentation doesn’t call this out explicitly for VME, but the cluster-add process treats hosts as interchangeable once joined, and a host that drifted from the others in packages or kernel version is where the next debugging session starts.
Don’t preinstall KVM or OVS yourself. Cluster creation installs system packages for these dependencies as part of the build — that’s why hosts need outbound internet access to package repositories. A host with a different KVM version already on it is a host fighting the installer, not helping it.
Baseline requirements from the same table: one or more 64-bit x86 CPUs at 1.5 GHz minimum with Intel VT or AMD-V enabled, static IP addressing, DNS resolution of the VME appliance, and outbound internet access.
Network: build the bonds and VLANs before VME ever sees the host
This is host work, not cluster work, and it happens entirely in netplan.
Ubuntu 22.04 (and 24.04 by the same mechanism) uses netplan for networking, and VME does not configure it for you — establishing the networking configuration is documented as the customer’s responsibility, before the host is handed to a cluster build.
# Find the config file — don't guess the name
cd /etc/netplan
ls
# Typically one of:
#   50-cloud-init.yaml
#   00-installer-config.yaml
#   01-netcfg.yaml

# Back it up before touching it
sudo cp /etc/netplan/<file-name>.yaml /etc/netplan/<file-name>.yaml.bak

# Edit it — this is where bonds and VLAN sub-interfaces get defined
sudo vi /etc/netplan/<file-name>.yaml

# Validate AND apply — never `netplan apply` on a remote host
sudo netplan try
netplan try is the one to use, every time, on a box you’re connected to over the network it’s about to reconfigure. It validates the change, applies it, and automatically rolls it back if it’s invalid — netplan apply gives you no such safety net, and a bad interface definition on your only route to the host means a trip to the console.
Interface layout. It isn’t strictly required, but the documentation’s own example — and every real cluster I’d build from it — uses three separate interfaces: one for cluster management traffic, one for storage, one for compute. The example maps these to eth0, eth1 and eth2; find your actual names with ip a. Build any bonding across physical NICs at this layer, in netplan, so that by the time you reach the cluster wizard you’re handing it three stable interface names, not three individual links you’re hoping stay up.
VLANs on the compute path are handled slightly differently — you don’t tag them in netplan at all. The cluster-creation wizard has a COMPUTE VLANS field that takes a single VLAN ID or a range (for example 22-25), and it turns that into Open vSwitch port groups that show up as selectable networks at provision time. Your job in netplan is just to make sure the interface you name as the compute interface is trunked correctly upstream to carry them.
MTU and jumbo frames: two different settings, two different times
There’s a network-floor requirement and a per-network MTU setting, and they aren’t the same knob.
The floor, set at the host/cluster level, before you build anything: clustered storage needs as much bandwidth as it can get, and the documentation is blunt about it — network interfaces of at least 10 Gbps with jumbo frames enabled are required for clustered storage, and for any situation where all traffic collapses onto the management interface because no dedicated compute or storage interface exists. Performance below that is described as highly likely to be unacceptable. This is a netplan-and-switch-config decision, made before cluster creation, on every host uniformly.
The per-network setting, made later, inside VME: once hosts are clustered, an HVM Data Network (Infrastructure > Network > Networks > + Add > HVM Data Network) creates a Linux VLAN interface on each host, mapped to a libvirt network, specifically for high-throughput in-guest storage traffic such as iSCSI or NFS. Its MTU field is a straight choice: 1500 for standard frames, 9000 for jumbo. Two constraints apply here that catch people who set it and move on: MTU changes only apply to stopped VMs, and the corresponding interface inside the guest has to be set separately (ip link set <iface> mtu 9000) with the VM stopped and restarted afterward. Setting 9000 on the network object and leaving the guest NIC at 1500 gets you fragmentation, not a matching jumbo path end to end.
Storage presentation: raw, unRAIDed, and identified up front
This is the one that costs people the most time when they get it wrong, because the failure doesn’t show up until cluster build.
Find the device before you start. lsblk on the host will show you the target — the documentation’s own example uses /dev/sdb.
Do not RAID the data disks on physical servers. VME wants raw devices for converged (Ceph) storage; RAID underneath it works against what Ceph is doing, not with it. If a host has multiple disks to contribute, list them comma-separated in the DATA DEVICE field at cluster setup (/dev/sda,/dev/sdb,/dev/sdc, and so on) — these, together with every other node’s disks, get pooled into one large volume presented to the cluster.
Sizing, briefly (the full build sheet is in A1.6): a 15 GB OS disk minimum, and a converged data disk of at least 500 GB for testing — more for production. Host memory needs 4 GB per Ceph disk, on top of whatever the workloads need, so a host contributing four disks needs 16 GB for Ceph alone before a single VM boots.
Non-converged is a different path entirely. If you’re not doing HCI, hosts don’t need local data disks at all — configure external storage (NFS or an iSCSI target) instead, and the host stays compute-only. That’s a design decision made back in A1.7, not something to switch mid-build.
The cluster’s home is a Private Cloud-type Cloud. HVM clusters live inside one, per A1.2; use an existing one or create it before you reach the Add Cluster screen, so it’s there to select rather than something you’re improvising mid-wizard.
Pre-flight: run this on every host, before you touch the wizard
# OS build and version
lsb_release -d

# Virtualisation enabled in firmware
grep -Eoc '(vmx|svm)' /proc/cpuinfo          # must be > 0

# Static addressing in place, and interface names/MTU as expected
ip -br a
ip link show | grep -i mtu

# The VME appliance resolves and answers on 443
getent hosts vme-manager.example.com
curl -sk -o /dev/null -w '%{http_code}\n' https://vme-manager.example.com

# Package repos reachable — cluster build installs KVM and OVS from here
sudo apt-get update -qq && echo "repos ok"

# Target data disk(s) raw and unmounted — never RAIDed
lsblk -o NAME,SIZE,TYPE,MOUNTPOINT,FSTYPE

# Time in sync — cluster membership depends on it
timedatectl show -p NTPSynchronized

# SSH access with a sudo-capable user, on the port the wizard expects
whoami && sudo -n true && echo "sudo ok"
If every host comes back clean, cluster creation is the anticlimax it should be. If one doesn’t, fix it on that host and re-run the check before moving to the next — the wizard runs across all nodes at once, and a single non-compliant host makes the eventual error message harder to trace back to its cause.
Gotchas and caveats
Don’t hand-edit 50-cloud-init.yaml and expect it to stick. Cloud-init regenerates its own config file on some images; if your changes keep reverting, that’s usually why. Back up whichever file actually governs the interface, and confirm it after a reboot, not just after netplan try.
22.04 hosts get the older cluster layout (1.1), not 1.2+. There’s no compatibility gain from mixing — if some nodes are 24.04 and others 22.04, resolve that before building, don’t assume VME will pick the newer layout for you.
The SSH host name in the wizard is a display label, not a real hostname requirement. What matters is the IP, the SSH port (22 by default, changeable), and a regular user with sudo access — key or password, either is accepted.
The COMPUTE VLANS field accepts a single ID or a range (1 or 22-25) and turns it directly into selectable OVS port groups — plan your VLAN allocation before you type it in, since this is what provisioning dropdowns will show workload owners.
MTU changes only take effect on stopped VMs, and the guest-side interface MTU is a separate, manual step. Forgetting either half is the most common cause of “I set jumbo frames and nothing got faster.”
Separate interfaces for management, storage and compute are recommended, not enforced. VME will let you collapse everything onto one NIC — but that’s exactly the configuration the 10 Gbps/jumbo-frame requirement is warning you about.
Key takeaways
- Build every node on Ubuntu 24.04 (or 22.04 only if you accept the older cluster layout), with static IPs, DNS to the appliance, and outbound internet.
- Do bonds and VLAN interfaces in netplan, before the cluster wizard — VME configures OVS port groups for compute VLANs, not your host’s physical network.
- Always
netplan try, nevernetplan apply, on a host you’re connected to remotely. - 10 Gbps with jumbo frames is the floor for clustered storage; the HVM Data Network’s own MTU setting (1500/9000) is a separate, later, per-guest-restart configuration.
- Data disks are raw and unRAIDed — find them with
lsblk, list multiples comma-separated, and they pool into one volume across every node. - Run the pre-flight checklist on every host before opening Add Cluster; the wizard’s own error messages rarely point at the actual non-compliant node.
What’s next
Next in this track: A2.3 — Building the First Cluster. Walking the Add Cluster wizard itself — HCI vs non-HCI layout, the three-node minimum, what actually happens on each host during the build, and how to read it when one node doesn’t come up clean.
Sources: HPE Morpheus VM Essentials Software Documentation v9.0.1
Pingback: Building the First Cluster – silverX.org
Pingback: Cluster Networking – silverX.org